Setup guide for Simracing
The point of a setup is not to make the car faster, but in fact make the car more stable to drive. The point of a setup is to eliminate any sort of instabilities and weakness of a car, such as understeer and oversteer. Yes, with a proper setup, the car can set faster lap times, but it doesn’t mean the car is faster. It just means the driver can push the car closer to the limits.
This setup guide’s objective is not to set fast lap times, but consistent ones. You can go 2.15 around spa in a GT3 car with an unsafe setup once and be inconsistent for the rest of the time, or you can do 2.19 on each and every lap for the entire weekend. The choice is up to you.
Surely, there are people who can do 2.15 around Spa consistently, but that is because they have found the perfect tools, perfect lines, and perfect setup to suit their driving. I personally am using a T300 with a T3PA pedals, and I can set lap times as fast as 2.19 in almost every GT3 car and GTE car I drive (in Assetto Corsa). I can push the car harder, but I am having issues with braking at the moment as the T3PA pedals is preventing me from executing trail-braking.
This setup guide is based on the experience I have with the sim I am using, which is Assetto Corsa. I have been playing this game since 2017 and at the time, I have zero knowledge and skills about setups. For the past year, I’ve been learning more about setups from various different people: mechanics, sim-racers, youtubers like Chris Haye and Engineering Explained, and thanks to all of them, I was able to gain this much knowledge.
Anyways, let’s get on with the setups.
Tyres
Tyre temperatures can be set as IMO, which stands for Inner/Mid/Outer. This is because the inner, middle and outer part of the tyres can vary in terms of temperatures. You would want the O to be warmer than M, then the I to be the least warm. IMO can be adjusted with camber, but that would be for later.
Tyre pressures can affect the grip and temperature of the tyre drastically. Lower pressure means more heat, means more grip. However, too little pressure can overheat the tyres and make it lose rubber and grip.
If the tyre overheats, increase the pressure. If your tyres is not getting enough heat, drop the pressure.
Alignments
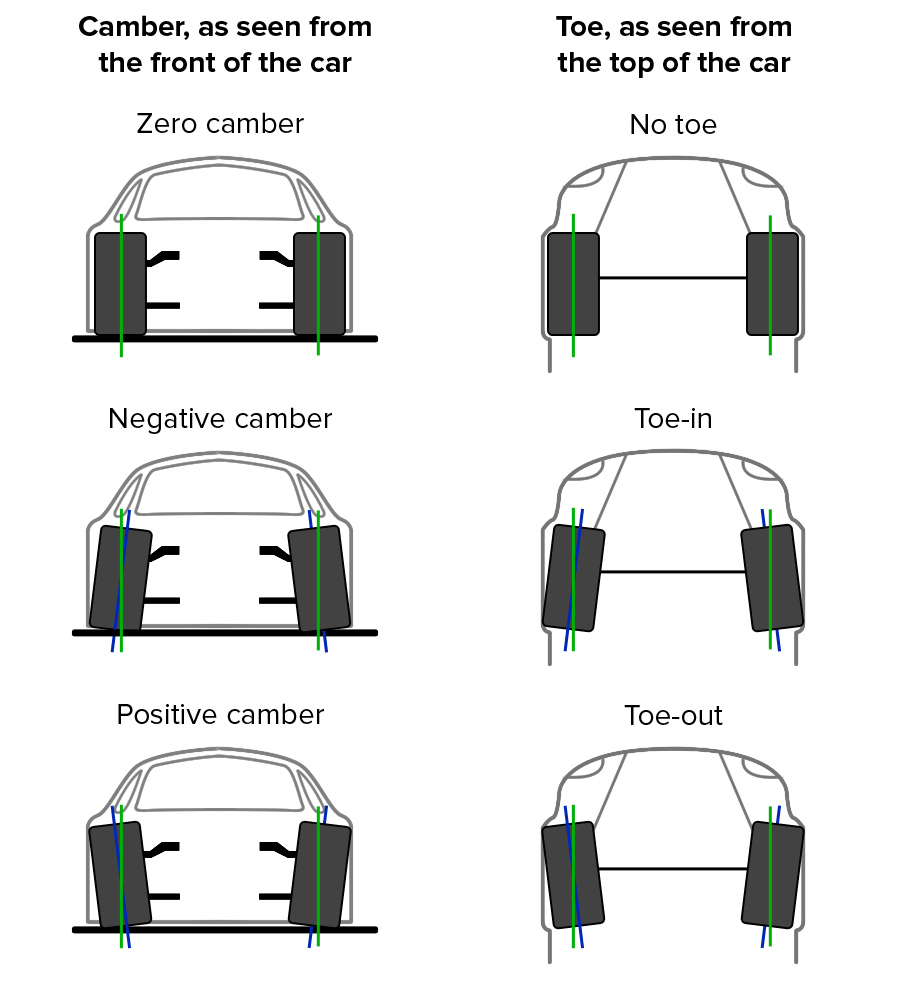
Camber is the vertical angle of the wheel of a car. This one is sometimes adjusted to alter the IMO tyre temperatures of the car, but it is mostly adjusted to alter the stability. Having negative camber is common in racing and it improves stability, like a pyramid. Positive camber is mostly used in road cars and rarely used in racing. Having zero camber means the tyres and wheels is completely straight and has zero degrees angle. In racing, you would want either zero or negative camber. However, having too much camber angle will not have a positive effect as heat is spread out too unequally. It is advised (by Chris Haye) that a maximum of 5°c difference should be spread out across IMO. Otherwise the tyre will face a lot of issues. Blowouts perhaps.
Toe is the angle which the front of the tyre is facing, whether it is towards the centre of the car (toe in) or away from the centre of the car (toe out). Toe can affect the stability of a car drastically in some occasions, but they are lightly adjusted as having too much toe angle will cause a lot of problem, such as loss of speed and tyre overheating. However, adjusting toe angle even by a little can have drastic effects.
Toe in (Front): Improves turn in stability
Toe out (Front): Improves turn in response
Toe in (Rear): Improves turn out stability
Toe out (Rear): Encourages car to spin out. Only applied for drifting
Caster is the angle of the of the suspension when looking from the side, which is adjusted to improve the feel of the car. This setting is rarely adjusted. *I have no knowledge on caster*
Suspension
The point of adjusting a suspension is to make sure the car can attack corners at speed without instability. This part of the setup is especially tricky as some instabilities are different. Sometimes, cars will understeer or oversteer because there’s no grip on the tyres (suspension too stiff) or because there’s nothing to eliminate/counter the excess weight transfer (suspension too soft). If you can feel the chassis flex, then this will not be an issue, but for beginners, even many long-term sim-racers (I think) have trouble distinguishing the types of instability they are facing.
If you are a beginner, you only need to understand this.
| Wheel rate/Spring rate | |
| Front | Stiffen to eliminate turn in oversteer |
| Soften to eliminate turn in understeer | |
| Rear | Stiffen to eliminate turn out understeer |
| Soften to eliminate turn out oversteer |
| Anti-roll bar | |
| Front | Stiffen to eliminate turn in oversteer |
| Soften to eliminate turn in understeer | |
| Rear | Stiffen to eliminate turn out understeer |
| Soften to eliminate turn out oversteer |
For starters, start with a default setup. Then you slowly adjust the settings based on the new knowledge you’ve learned.
If you go for a soft suspension setup, and many instabilities are cured, then that’s it. However, if you soften your suspension setup only to find it worse, stiffen it will definitely be the solution.
Damper
Another term for shock-absorbers. These adjust the behaviour of the suspension when cornering. Under many occasions, dampers are lightly adjusted. But I personally don’t touch them as I have very little knowledge about them. But all I know is this:
Bump: adjust the speed of compression of suspension when entering a corner
Rebound: adjust the speed of expansion of suspension when exiting a corner
Fast Bump: adjust the speed of compression when going over bumps and kerbs
Fast Rebound: adjust the speed of expansion when going over bumps and kerbs
Normally, people would set the rebound settings higher than bump because it is more favourable for compression to be faster than expansion.
I normally would only touch the rebound settings to favour my car around chicanes. This is because around chicanes, as soon as I exited the first turn, I will need to change the direction of my car immediately. This will swing the back end of my car to the opposite side and cause me to lose a lot of control. This is because the expansion speed of my rear dampers is too fast. By increasing the rebound value, I slow down the expansion speed, hence I reduced the weight transfer speed of my car.
Aero
I have very little knowledge about aero, but all I know is the greater the angle of the wing, the greater the downforce. However, with so much mechanical grip playing on your car, is downforce really necessary? Having too much downforce will sacrifice a lot of top speed and acceleration, which will compromise a lot of time, especially in tracks with many long straights.
My advice is: don’t touch aerodynamics first. Settle with mechanical grip then only the aerodynamics.
Ironically, even I failed to follow this.
Ride height
Ride height plays quite a big role in aerodynamics. Yes, the closer the car to the ground, the more downforce the car has. However, having too low means the suspension will not have enough to travel. This means the car can understeer a lot of times, but more importantly the car will hit the ground more often, resulting in the car bottoming out and spin out. People will often resolve to raising the car back up or stiffening the spring rate.
Another thing about ride height is rake angle. Rake angle is the angle of a car from front to rear. When setting up the rake angle, you would want the front end to be lower than the back. This is so that the rear-bottom end of the car can become a diffuser which generates low pressure, forcing the rear wheels to stick to the ground.
Brake Bias
The braking force ratio of the front and rear brakes. When setting up brake bias, you would want the front brakes to be more powerful than the rear.
With too much braking force at the rear, you will experience oversteer before you even reach the corner. As soon as you slam the brakes, the back end of your car will slide out and give you oversteer.
Conversely, having too much braking force on the front will also be a problem. With too much front bias, your car will experience loads of understeer. You will also face difficulties turning the car after you release the brake.
In real life, brake bias is adjusted by ±5%. Rarely more than that.
I normally drive 65%-70% brake bias, whether it is a front-engine car or mid-engine.
Differential (LSD)
If you do not know how an LSD works, you must know how a differential works in order to understand an LSD. A differential is a component of a car which rotates the wheel with the help of an engine and gearbox. Many road cars has an open diff, but in many race cars, they have something called an LSD(not the drug).
A differential is a component which allows one wheel to spin less than the other when the car is turning. In an open diff, the wheels is completely independent to one another and has nothing to resist their rotation. This helps cars to be able to turn in a smaller diameter which is favourable around cities. It also helps preserve the life of tyres better.
As for an LSD, it is another type of diff with a torsion spring inside. The spring helps lock the two wheels together which limits independency. This means around the track, you can get faster cornering speeds as both wheels are working together to give maximum speed and grip on both tyres.
In the diff settings, you can adjust three things: Diff power, diff coast, and diff preload.
Diff power is the rate of acceleration on the differential when you press the gas. The higher the value the more responsive the acceleration is. If too much power is set on the diff, the car will oversteer.
Diff coast is the rate of deceleration when you lift off the gas. The higher the value, the slower the deceleration. If too much coast is added, the car will not slow down and will understeer during cornering. If not enough coast is added, the car will experience oversteer.
Diff preload is the value of how much torque is applied in the differential. The higher the value the more locking the diff has, although too much may result in understeer at many corners. The lower the value, the more open the diff becomes, although too open can result in dangerous oversteer even at straight lines.
